
主题优化
主题配置介绍
我这里只讲自己在使用的 yelle 主题,你可以参考下,可能还有一些改动我后续会自己在慢慢改,但是大体基本也就这样了。
从中我们也可以看出,对于主题来讲,大部分可以配置的地方其实都是在这里的,所以对于主题的使用者来讲,懂这里很重要。
- 基本上主题的配置文件都是有内容改,但是下面这几点我觉得特别重要:
duoshuo,如果你是打算采用多说评论系统的话,你需要设置这里,但是我个人对多说没好印象youyan,有言也是国内实用比较多的评论系统之一,个人感觉相对比较稳定open_in_new,我个人觉得这个东西就应该是 true,不是用新标签的都是坏人baidu_tongji,我个人使用的是百度统计,具体百度统计的使用可以查看百度统计官网:http://tongji.baidu.com我的 yelle 主题配置
1 | # Theme Version | 当前版本 |
常用页面添加
404、关于我、标签页
- 还是以上一篇文章我们讲解的项目根目录上:E:\blog_space\hexo,在该目录启动 Git Bash:
- 新增一个 404 页面:
hexo new page 404 - 新增一个 about 页面:
hexo new page about - 新增一个 tag 标签云页面:
hexo new page tags - 新增一个 robot.txt 文件,把该文件放在:E:\blog_space\hexo\source 目录下,如果你没有该文件可以到我的项目上找:https://github.com/chenjh0611/chenjh0611.github.io
- robot 文件内容:
1
2
3
4
5
6
7
8
9
10
User-Agent: *
Allow: /
Disallow: /background
Disallow: /css
Disallow: /fancybox
Disallow: /font-awesome
Disallow: /img
Disallow: /js
Sitemap: http://code.skyheng.com/sitemap.xml
Sitemap: http://code.skyheng.com/baidusitemap.xml
在md文件的Front-matter区域添将comments设置为flase的话,将不会展示评论界面。
设置分类
在我们编辑文章的时候,直接在categories:项填写属于哪个分类,但如果分类是中文的时候,路径也会包含中文。 比如分类我们设置的是:
categories: 编程 那在生成页面后,分类列表就会出现编程这个选项,他的访问路径是:*/categories/编程
如果我们想要把路径名和分类名分别设置,需要怎么办呢?
打开根目录下(并非主题目录)的配置文件_config.yml(别打开错了),找到如下位置做更改(设置种类):1
2
3
4
5
6
7
8# Category & Tag
default_category: uncategorized
category_map:
编程: programming
Hexo:Hexo
生活: life
其他: other
tag_map:
在这里category_map:是设置分类的地方,每行一个分类,冒号前面是分类名称,后面是访问路径。 可以提前在这里设置好一些分类,当编辑的文章填写了对应的分类名时,就会自动的按照对应的路径来访问。
置顶文章方法
- 参考:
- 编辑这个文件:
node_modules/hexo-generator-index/lib/generator.js在生成文章之前进行文章top值排序。 - 覆盖原文件内容,采用下面内容:
1 | 'use strict'; |
- 然后在文章头部的:Front-matter位置加上一个:
top: 1000的内容。数值越大,越靠前
另外一种解决方案:
- hexo博客优化之文章置顶+置顶标签
文章中卸载hexo-generator-index使用cnpm install --save hexo-generator-index-pin-top插件来实现,安装这个插件然后在需要置顶的文章的Front-matter中加上top: true即可,也可以是数值,数值越大,越靠前
字数统计和阅读时长
Next 是已经集成了这个功能,所以还是得需要咱们自己完成,首先看一下官网的使用帮助hexo-wordcount.
集成步骤
- 先安装插件
hexo-wordcount、执行cnpm install --save hexo-wordcount安装 文件配置、在
yelee/layout/_partial/post/word.ejs下创建word.ejs文件:1
2
3
4
5
6
7
8
9
10
11
12
13
14
15
16
17
18<div style="margin-top:10px;">
<span class="post-time">
<span class="post-meta-item-icon">
<i class="fa fa-keyboard-o"></i>
<span class="post-meta-item-text"> 字数统计: </span>
<span class="post-count"><%= wordcount(post.content) %>字</span>
</span>
</span>
<span class="post-time">
|
<span class="post-meta-item-icon">
<i class="fa fa-hourglass-half"></i>
<span class="post-meta-item-text"> 阅读时长: </span>
<span class="post-count"><%= min2read(post.content) %>分</span>
</span>
</span>
</div>然后在
themes/yelee/layout/_partial/article.ejs文件中<%- partial('post/title', {class_name: 'article-title'}) %>后面添加如下代码1
2
3<% if(theme.word_count && !post.no_word_count){ %>
<%- partial('post/word') %>
<% } %>在
<div class="article-info article-info-post">后添加如下代码1
2
3
4<% if(theme.word_count && !post.no_word_count){ %>
<br>
<br>
<% } %>在主题
_config.yml中配置word_count是否需要添加字数统计功能控制的flag、在md文件的Front-matter区域添加no_word_count为true即配置文章不需要显示字数统计功能
article.ejs文件中代码块示例1
2
3
4
5
6
7
8
9
10
11
12
13
14
15
16
17
18
19<% if (post.link || post.title){ %>
<header class="article-header">
<%- partial('post/title', {class_name: 'article-title'}) %>
<% if(theme.word_count && !post.no_word_count){ %>
   <%- partial('post/word') %>
<% } %>
</header>
<% if (!index){ %>
<div class="article-info article-info-post">
<% if(theme.word_count && !post.no_word_count){ %>
  <br>
  <br>
<% } %>
<%- partial('post/category') %>
<%- partial('post/tag') %>
<div class="clearfix"></div>
</div>
<% } %>
<% } %>
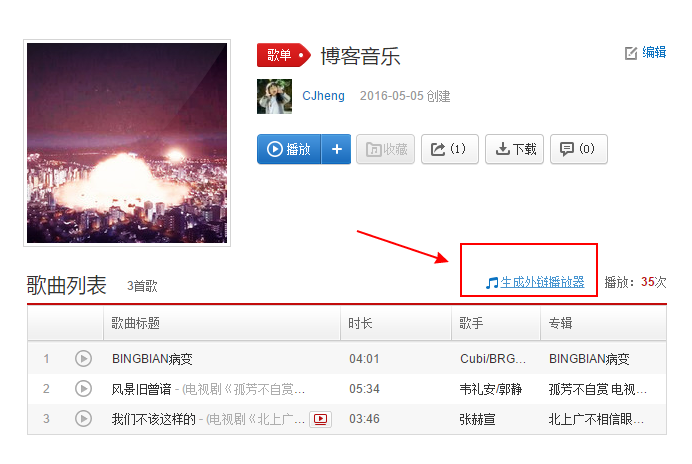
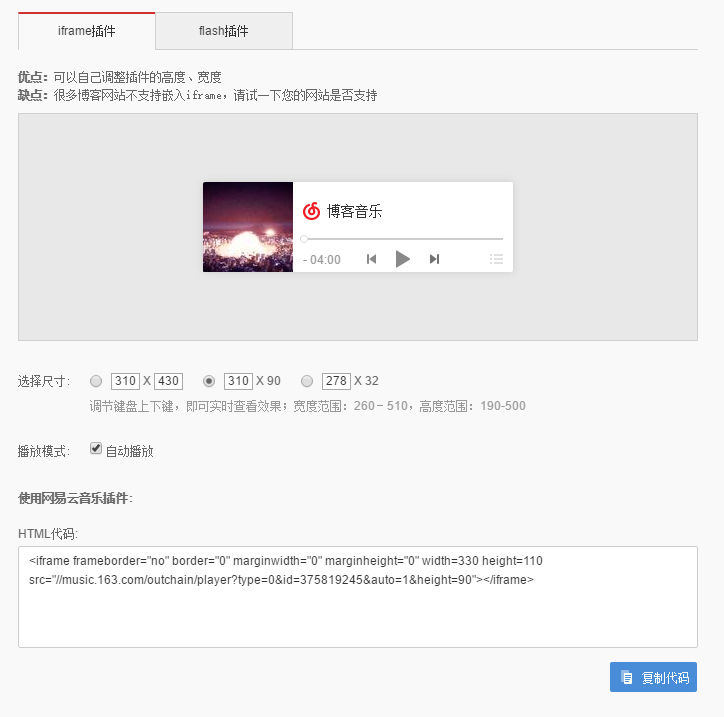
网易云音乐
鼠标点击效果
废话不多说,直接看如何集成。 拷贝需要的文件、进入到我的备份,拷贝文件。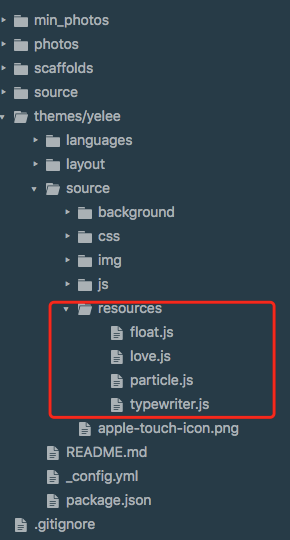
拷贝resources下的所有文件到您对应的目录。
打开themes/yelee/layout/_partial/after-footer.ejs文件,添加刚刚添加文件的配置。1
2
3
4
5
6<% if (theme.background_animation){ %>
<script type="text/javascript" src="/resources/love.js"></script>
<script type="text/javascript" src="/resources/float.js"></script>
<script type="text/javascript" src="/resources/typewriter.js"></script>
<script type="text/javascript" color=0,104,183 opacity=1 zindex=-1 count=50 src="/resources/particle.js"></script>
<% } %>
快速实现博客压缩
项目压缩也叫代码丑化, 分别对 html、css、js、images进行优化,即把重复的代码合并,把多余的空格去掉,用算法把 images 进行压缩。压缩后的博客,加载速度会有较大的提升,自然能留住更多游客。
蛮多朋友使用了gulp对博客进行压缩,这也是一个办法,但在社区逛了下,找到了一个比较好用的模块hexo-all-minifier,这个模块集成了对 html、css、js、image 的优化。安装上此模块后,只要在根目录下的_config.yml文件中加上如下字段就可对博客所有内容进行压缩。1
2
3
4
5
6
7
8
9
10
11
12
13
14
15
16
17
18
19
20
21
22
23
24
25html_minifier:
enable: true
ignore_error: false
exclude:
css_minifier:
enable: true
exclude:
- '*.min.css'
js_minifier:
enable: true
mangle: true
output:
compress:
exclude:
- '*.min.js'
image_minifier:
enable: true
interlaced: false
multipass: false
optimizationLevel: 2
pngquant: false
progressive: false
文章链接唯一化
也许你会数次更改文章题目或者变更文章发布时间,在默认设置下,文章链接都会改变,不利于搜索引擎收录,也不利于分享。唯一永久链接才是更好的选择。
- hexo-abbrlink介绍:https://post.zz173.com/detail/hexo-abbrlink.html、GitHub地址:hexo-abbrlink
安装:cnpm install hexo-abbrlink --save
在站点配置文件中查找代码permalink,将其更改为:permalink: posts/:abbrlink/ # posts/可自行更换
这里有个知识点:
百度蜘蛛抓取网页的规则: 对于蜘蛛说网页权重越高、信用度越高抓取越频繁,例如网站的首页和内页。蜘蛛先抓取网站的首页,因为首页权重更高,并且大部分的链接都是指向首页。然后通过首页抓取网站的内页,并不是所有内页蜘蛛都会去抓取。
搜索引擎认为对于一般的中小型站点,3层足够承受所有的内容了,所以蜘蛛经常抓取的内容是前三层,而超过三层的内容蜘蛛认为那些内容并不重要,所以不经常爬取。出于这个原因所以permalink后面跟着的最好不要超过2个斜杠。
- 然后在
站点配置文件中添加如下代码:1
2
3
4# abbrlink config
abbrlink:
alg: crc32 # 算法:crc16(default) and crc32
rep: hex # 进制:dec(default) and hex
可选择模式:
- crc16 & hex
- crc16 & dec
- crc32 & hex
- crc32 & dec
示例:
生成的链接如下所示:1
2
3
4
5
6
7
8crc16 & hex
https://post.zz173.com/posts/66c8.html
crc16 & dec
https://post.zz173.com/posts/65535.html
crc32 & hex
https://post.zz173.com/posts/8ddf18fb.html
crc32 & dec
https://post.zz173.com/posts/1690090958.html
Yelog—对Yelee主题的改进
由于Yelee主题存在代码块上下出现空格的情况以及主题布局尺寸固定的情况,Yelog主题对Yelee主题进行了改进,github地址如下:
https://github.com/yelog/hexo-theme-yelog
使用Yilia主题需要
- 在查看所有文章的时候需要
1、请确保node版本大于6.2
2、在博客根目录(注意不是yilia根目录)执行以下命令:npm i hexo-generator-json-content –save
3、在根目录_config.yml里添加配置:1
2
3
4
5
6
7
8
9
10
11
12
13
14
15
16
17
18jsonContent:
meta: false
pages: false
posts:
title: true
date: true
path: true
text: false
raw: false
content: false
slug: false
updated: false
comments: false
link: false
permalink: false
excerpt: false
categories: false
tags: true
显示pdf的支持
- 安装:
cnpm install --save hexo-pdfgithub地址:hexo-pdf - 使用示例:
插件推荐
插件的基本使用命令
- 插件官网:https://hexo.io/plugins/
- 安装插件:
npm install 插件名 --save - 卸载插件:
npm uninstall 插件名 - 更新插件和博客框架(需要在 E:\blog_space\hexo 目录下):
npm update - 它实质上是通过项目根目录下 package.json 文件更新各大组件
必备插件
- 支持RSS:
cnpm install hexo-generator-feed --save - 生成站点地图:
cnpm install hexo-generator-sitemap --save - 生成百度站点地图:
cnpm install hexo-generator-baidu-sitemap --save - HTML 压缩:
cnpm install hexo-html-minifier --save - JavaScript 压缩:
cnpm install hexo-uglify --save - CSS 压缩插件:
cnpm install hexo-clean-css --save - SEO优化:
cnpm install hexo-generator-seo-friendly-sitemap - 站内搜索:
hexo-generator-search插件为 Hexo3 提供搜索功能。 安装:cnpm install hexo-generator-search --save
其他插件支持
结束语
- 真心希望这是 Hexo 最后一篇,因为我们只是要安心写东西而已,不需要太多折腾。
参考资料
- 搭建Hexo博客进阶篇–API和一些小部件(四)
- hexo链接持久化终极解决之道
系列博文整理
整理了下hexo系列的文章,发现这位博主写系列博客感觉还是很棒的: